-
Everyone wants to know how to create a paid community — but almost nobody names the real thing holding them back. Vote below. I read every answer, and I'm building next week's challenge around your answers.
What's stopping you from creating a profitable paid online community?Everyone wants to know how to create a paid community — but almost nobody names the real thing holding them back. Vote below. I read every answer, and I'm building next week's challenge around your answers. What's stopping you from creating a profitable paid online community?0 Comments 0 Shares 498 Views 0 Reviews -
-
How to build an online community… without giving away all your best knowledge for free
For years, I thought the only way to grow online was to constantly post, chase views, and hope the algorithm sent the right people my way.
But here’s what I realized…
Your knowledge has value.
Your experience has value.
The solutions you’ve learned the hard way can become the foundation of a thriving online community.
Building an online community isn’t just about getting followers. It’s about creating a space where people can learn from you, connect with others, get support, and transform their goals into results.
Whether you’re a coach, creator, entrepreneur, educator, or someone with a skill people want to learn — you don’t need to post 24/7 to make an impact.
You need the right community.
The biggest shift? Stop thinking:
“I need more followers.”
Start thinking:
“How can I create a place where my people want to stay?”
That’s how you build an online community that can grow into courses, memberships, coaching, and multiple income streams.
And yes… I was literally creating waves on a mannequin when I had this realization. 😂
#HowToBuildAnOnlineCommunity #OnlineCommunityBuilder #CommunityBuilding #CreatorEconomy #DigitalProducts #OnlineBusiness #MonetizeYourKnowledge #PaidCommunityHow to build an online community… without giving away all your best knowledge for free For years, I thought the only way to grow online was to constantly post, chase views, and hope the algorithm sent the right people my way. But here’s what I realized… Your knowledge has value. Your experience has value. The solutions you’ve learned the hard way can become the foundation of a thriving online community. Building an online community isn’t just about getting followers. It’s about creating a space where people can learn from you, connect with others, get support, and transform their goals into results. Whether you’re a coach, creator, entrepreneur, educator, or someone with a skill people want to learn — you don’t need to post 24/7 to make an impact. You need the right community. The biggest shift? Stop thinking: “I need more followers.” Start thinking: “How can I create a place where my people want to stay?” That’s how you build an online community that can grow into courses, memberships, coaching, and multiple income streams. And yes… I was literally creating waves on a mannequin when I had this realization. 😂 #HowToBuildAnOnlineCommunity #OnlineCommunityBuilder #CommunityBuilding #CreatorEconomy #DigitalProducts #OnlineBusiness #MonetizeYourKnowledge #PaidCommunity 0 Comments 0 Shares 571 Views 0 Reviews
 -
Got it—do you want a quick primer on web hosting basics, or guidance on how to test/evaluate a web host? Here’s a concise overview of both:
Web hosting basics
- What it is: A service that stores your website’s files and serves them to visitors over the internet.
- Common types:
- Shared: Cheapest, resources shared with others. Good for small sites.
- Managed WordPress: Shared/VPS with WordPress-specific tuning and support.
- VPS: Virtual private server; dedicated resources, more control.
- Dedicated: Entire physical server; high performance, highest cost.
- Cloud: Scalable virtual machines (AWS, GCP, Azure, DigitalOcean).
- Key terms:
- Domain and DNS: Your site’s address and the system that points it to your host.
- Nameservers: Where your DNS is managed.
- SSL/TLS: HTTPS encryption; often free via Let’s Encrypt.
- CDN: Globally caches assets for speed (Cloudflare, Fastly).
- Control panel: cPanel, Plesk, or a custom dashboard.
- What a plan usually includes: Disk space, bandwidth, CPU/RAM share, databases, email, SSL, backups, support.
- Typical flow to launch:
1) Buy a domain
2) Point nameservers/DNS to host
3) Upload site (SFTP/Git) or install CMS
4) Set up database and environment variables
5) Enable SSL and caching/CDN
6) Test and go live
How to test a web host
- Performance
- Speed/TTFB: WebPageTest, GTmetrix, Pingdom, PageSpeed Insights.
- Load testing: k6, wrk, ApacheBench (ab) to simulate traffic.
- Example: wrk -t4 -c100 -d30s https://yoursite.com
- Example: ab -n 1000 -c 50 https://yoursite.com/
- Geographic latency: test from multiple regions with WebPageTest.
- Uptime and monitoring
- UptimeRobot, Better Uptime, StatusCake for 24/7 checks.
- SSL and security
- SSL config: Qualys SSL Labs test.
- Basic headers: securityheaders.com
- DNS and propagation
- dig or nslookup to verify records:
- dig A yourdomain.com +short
- Server limits/stack
- PHP/Node/Python versions, HTTP/2 or HTTP/3 support, Brotli/Gzip.
- Inode limits, CPU throttling, memory constraints.
- Database performance
- Run simple queries; check slow query log (if VPS/dedicated).
- Reliability and support
- Open a support ticket with a technical question and time the response/quality.
- Backups and restores
- Trigger an on-demand backup and test restoring to staging.
What to look for when choosing
- Performance: Consistent low TTFB (<200–400 ms) and good P95 response under load.
- Uptime: 99.9%+ with status page and SLA.
- Security: Free auto-renewing SSL, WAF or CDN, 2FA, offsite backups.
- Backups: Daily at minimum, easy restores, retention 7–30 days.
- Support: 24/7 chat/tickets, real engineers for escalations.
- Transparency: Clear resource limits, renewal pricing, data center locations.
- Features: Staging sites, SSH/SFTP, Git deploys, cron jobs.
- Migration help: Free site migration is a plus.
Rough pricing guidance
- Shared/Managed WordPress (small sites): $3–$25/mo promo, renewals higher.
- VPS (growing sites/apps): $6–$40/mo base + backups, bandwidth.
- Managed cloud (high-traffic/prod): $50–$200+/mo.
Security and best practices
- Enforce HTTPS everywhere; HSTS if stable.
- Keep CMS/plugins/themes updated; least-privilege access.
- Use SSH keys, SFTP; enable 2FA.
- Offsite backups; test restores quarterly.
- WAF/CDN (e.g., Cloudflare) for DDoS and caching.
If you share your use case (site type, expected traffic, tech stack, budget, preferred regions), I can recommend a hosting type and a quick testing checklist tailored to you.Got it—do you want a quick primer on web hosting basics, or guidance on how to test/evaluate a web host? Here’s a concise overview of both: Web hosting basics - What it is: A service that stores your website’s files and serves them to visitors over the internet. - Common types: - Shared: Cheapest, resources shared with others. Good for small sites. - Managed WordPress: Shared/VPS with WordPress-specific tuning and support. - VPS: Virtual private server; dedicated resources, more control. - Dedicated: Entire physical server; high performance, highest cost. - Cloud: Scalable virtual machines (AWS, GCP, Azure, DigitalOcean). - Key terms: - Domain and DNS: Your site’s address and the system that points it to your host. - Nameservers: Where your DNS is managed. - SSL/TLS: HTTPS encryption; often free via Let’s Encrypt. - CDN: Globally caches assets for speed (Cloudflare, Fastly). - Control panel: cPanel, Plesk, or a custom dashboard. - What a plan usually includes: Disk space, bandwidth, CPU/RAM share, databases, email, SSL, backups, support. - Typical flow to launch: 1) Buy a domain 2) Point nameservers/DNS to host 3) Upload site (SFTP/Git) or install CMS 4) Set up database and environment variables 5) Enable SSL and caching/CDN 6) Test and go live How to test a web host - Performance - Speed/TTFB: WebPageTest, GTmetrix, Pingdom, PageSpeed Insights. - Load testing: k6, wrk, ApacheBench (ab) to simulate traffic. - Example: wrk -t4 -c100 -d30s https://yoursite.com - Example: ab -n 1000 -c 50 https://yoursite.com/ - Geographic latency: test from multiple regions with WebPageTest. - Uptime and monitoring - UptimeRobot, Better Uptime, StatusCake for 24/7 checks. - SSL and security - SSL config: Qualys SSL Labs test. - Basic headers: securityheaders.com - DNS and propagation - dig or nslookup to verify records: - dig A yourdomain.com +short - Server limits/stack - PHP/Node/Python versions, HTTP/2 or HTTP/3 support, Brotli/Gzip. - Inode limits, CPU throttling, memory constraints. - Database performance - Run simple queries; check slow query log (if VPS/dedicated). - Reliability and support - Open a support ticket with a technical question and time the response/quality. - Backups and restores - Trigger an on-demand backup and test restoring to staging. What to look for when choosing - Performance: Consistent low TTFB (<200–400 ms) and good P95 response under load. - Uptime: 99.9%+ with status page and SLA. - Security: Free auto-renewing SSL, WAF or CDN, 2FA, offsite backups. - Backups: Daily at minimum, easy restores, retention 7–30 days. - Support: 24/7 chat/tickets, real engineers for escalations. - Transparency: Clear resource limits, renewal pricing, data center locations. - Features: Staging sites, SSH/SFTP, Git deploys, cron jobs. - Migration help: Free site migration is a plus. Rough pricing guidance - Shared/Managed WordPress (small sites): $3–$25/mo promo, renewals higher. - VPS (growing sites/apps): $6–$40/mo base + backups, bandwidth. - Managed cloud (high-traffic/prod): $50–$200+/mo. Security and best practices - Enforce HTTPS everywhere; HSTS if stable. - Keep CMS/plugins/themes updated; least-privilege access. - Use SSH keys, SFTP; enable 2FA. - Offsite backups; test restores quarterly. - WAF/CDN (e.g., Cloudflare) for DDoS and caching. If you share your use case (site type, expected traffic, tech stack, budget, preferred regions), I can recommend a hosting type and a quick testing checklist tailored to you.0 Comments 0 Shares 430 Views 0 Reviews -
Stop Thinking "Platform." Start Thinking "Paid Community Ecosystem."
Ecosystem over platform: NetworQ Social isn't a sales funnel — it's a system that pays you starting with post one. It runs on three pages, each with a different job:
Personal Page builds Know-Like-Trust (your story, behind-the-scenes)
Business Page is where people buy (courses, products, paid posts)
Community Group is where your people stay and get held accountable ("do it with you").
Cramming all three jobs onto one profile is why people follow, watch, and never buy.
Pay members to stay: The retention hook is real cash, not badges — members earn points (that convert to money) for posting, commenting, and showing up, and coaches earn just for posting.
Framed as a small stipend that gives people a financial reason not to ghost the group after week two, flipping retention from something you beg for into something built in.Stop Thinking "Platform." Start Thinking "Paid Community Ecosystem." Ecosystem over platform: NetworQ Social isn't a sales funnel — it's a system that pays you starting with post one. It runs on three pages, each with a different job: Personal Page builds Know-Like-Trust (your story, behind-the-scenes) Business Page is where people buy (courses, products, paid posts) Community Group is where your people stay and get held accountable ("do it with you"). Cramming all three jobs onto one profile is why people follow, watch, and never buy. Pay members to stay: The retention hook is real cash, not badges — members earn points (that convert to money) for posting, commenting, and showing up, and coaches earn just for posting. Framed as a small stipend that gives people a financial reason not to ghost the group after week two, flipping retention from something you beg for into something built in.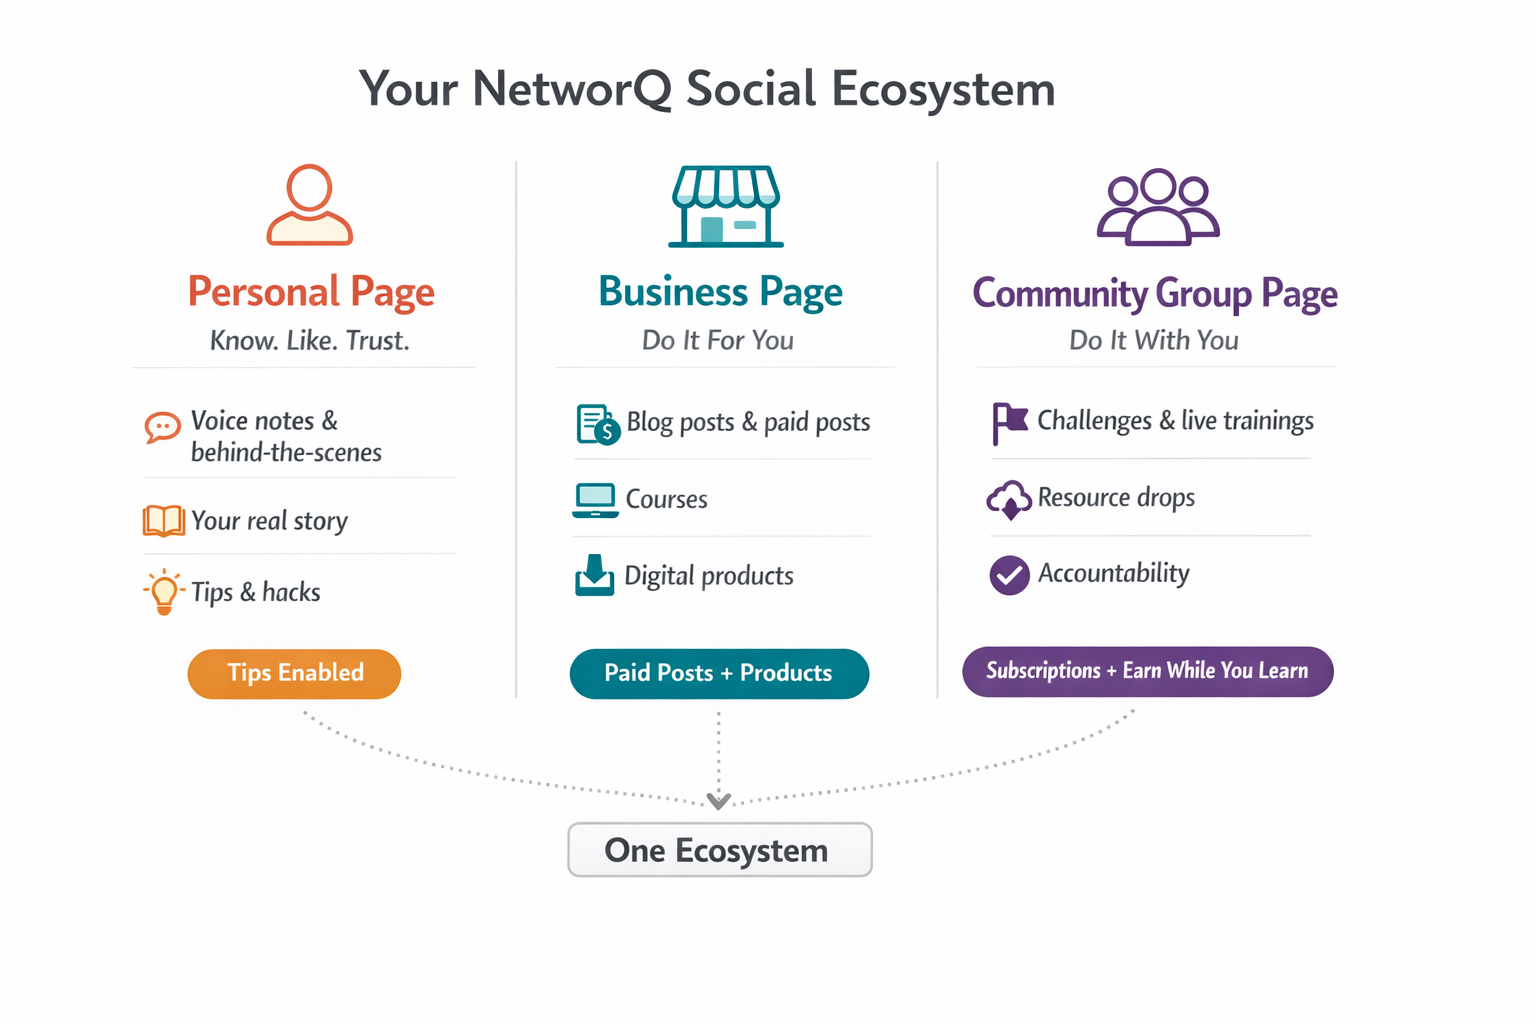 0 Comments 0 Shares 438 Views 0 Reviews
 -
When cutting the sides and nape of a quick weave I like to make a guideline first going around the shape, then I take my favorite feather razor and lightly stroke downwards lifting the hairs underneath to the guideline.
This will give a seamless blend.
If this helped a tip will be greatly appreciated so I can continue to give you free game like this.
You can watch the full video here: https://networq.co/posts/1437When cutting the sides and nape of a quick weave I like to make a guideline first going around the shape, then I take my favorite feather razor and lightly stroke downwards lifting the hairs underneath to the guideline. This will give a seamless blend. If this helped a tip will be greatly appreciated so I can continue to give you free game like this. You can watch the full video here: https://networq.co/posts/14370 Comments 0 Shares 4K Views 3 0 Reviews -
How to Shape Shift a Quick Weave — Precision Cutting Tutorial
Every quick weave starts as an inspiration image. What separates a good install from a great hairstyle is what happens AFTER — the precision cutting, the track placement, the shaping.
I call it Shape Shifting.
I’ve been perfecting this technique for four years. No formal training and no one showed me this. I figured it out myself — and now I’m teaching it to you step by step.
In this tutorial you’ll learn:
✂️ Precision cutting techniques for clean shapes
💇🏾♀️ Strategic track placement for a natural look
🎨 How to shape the style to fit your client’s face
⚡ How to cut your install time in half
🔁 How to make units removable or permanent
Also included:
📐 Hair cutting diagram so you can follow along visually
🛍️ Full product list — exactly what I use and where to get it
💵 Pricing list so you know exactly what to charge for this service
This is the same technique I use on real clients at Shanny’s Natural Beauty in Brooklyn, New York. This is the actual process from start to finish.
If you’re a stylist who wants to add a faster, more profitable service to your menu — this is your starting point.
Get instant access for a one time payment of just $17.👇How to Shape Shift a Quick Weave — Precision Cutting Tutorial Every quick weave starts as an inspiration image. What separates a good install from a great hairstyle is what happens AFTER — the precision cutting, the track placement, the shaping. I call it Shape Shifting. I’ve been perfecting this technique for four years. No formal training and no one showed me this. I figured it out myself — and now I’m teaching it to you step by step. In this tutorial you’ll learn: ✂️ Precision cutting techniques for clean shapes 💇🏾♀️ Strategic track placement for a natural look 🎨 How to shape the style to fit your client’s face ⚡ How to cut your install time in half 🔁 How to make units removable or permanent Also included: 📐 Hair cutting diagram so you can follow along visually 🛍️ Full product list — exactly what I use and where to get it 💵 Pricing list so you know exactly what to charge for this service This is the same technique I use on real clients at Shanny’s Natural Beauty in Brooklyn, New York. This is the actual process from start to finish. If you’re a stylist who wants to add a faster, more profitable service to your menu — this is your starting point. Get instant access for a one time payment of just $17.👇 File Type: pdf0 Comments 0 Shares 4K Views 0 Reviews


More Stories
Trending
© 2026 NetworQ Social -Build a Community That Learns, Shares, and Earns
 English